Sunday, October 5, 2014

Watercoloring Cards


Water coloring cards have been kind of popular in the cardmaking world for awhile. So we decided to jump on the bandwagon with it. And honestly, we just can't stop! We see what the big fuss is all about now. Once you start it's kind of hard to stop. There are so many techniques, tips and ideas out there. But it really comes down to what your preference is. Water coloring is very forgiving and you can't really go wrong with it. That's what makes it so fun.

Today we are using this Watercolor set from Target for only $9.99. 


This was our first watercolor paint set and we are by no means experts but this so far has been a big favorite. Ok, actually we LOVE it. For only $9.99, this came with the watercolor paint, paper and brushes. So all that is missing is the water. The quality of paint is good, even the brushes did the job but I found myself using other paint brushes I had on hand for coloring images. Its important to use watercolor paper because it will absorb the water and help with the colors. The possibilities are endless with this pallet of paint. So let's take a look at how easy it is.....


Using this clipboard helps with having something we can manuver the paper with. As you can see we just taped it down with some washi tape to prevent it from warping so much.. Using the watercolor paper that it came with, and some water we are to ready to start. 


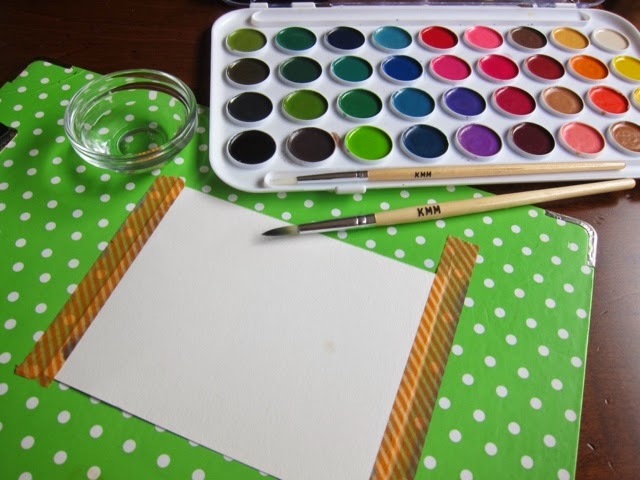
Like no joke, we just literally started painting on the paper. We took the paintbrush dipped it in water first and then to our pallet and on to the paper. That's it. Just make sure to clean your brush in water before moving on to another color. You don't want to mix the colors in your pallet. It really does not matter where or how you start. 


So now that we finished our painting, let's be a bit more creative. We took our wet paint brush and grabbed some brown paint and just "flicked" it on the paper to give it this splattered look. Looks like a mess right? Well, that's what so great about this, that's the look we are going for!  Once it's dried we can start stamping on it. Once dried, slap some glue tape on the back and throw it on some cardstock and we now have our card.


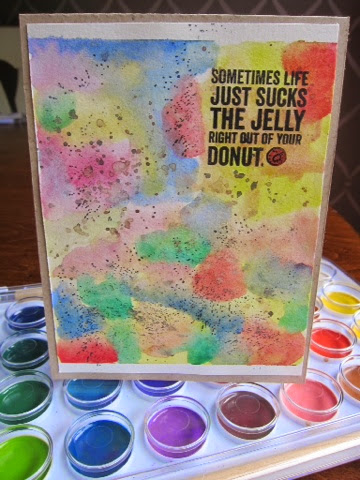
So easy!!! Here are some other cards we made using this watercolor paint:


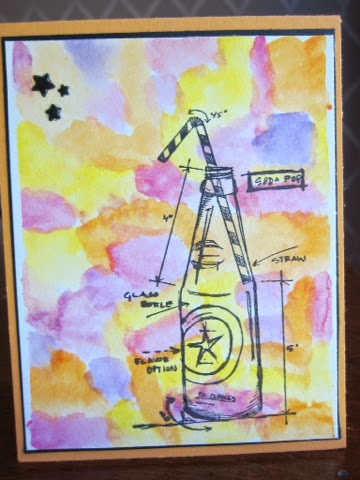
For this cute snake card we added some embossing paste to give it some texture. But notice how for this card we just painted the color on the paper. It gives it a different look while still looking like water coloring.


So like we said, the possibilities are endless. We hope you try water coloring and please share any projects with us. Don't forget to check out more of our watercolor projects on our Instagram!!

Thank you,
3 Chicks

Monday, September 1, 2014

Notecard Packs

Does 80 notecards sound like a lot to you? Well it is! Even us chicks say that's a lot of cards to have on hand. But what if we told you the cost to make this many cards would be around 3-4 cents per card?? Yeah, you heard right that is in cents per card. 

Today, we want to share with you how that can be. Now this would be for those of you who are new to cardmaking or those if you on a super tight budget.  Enclosed are some photos to give you and idea of what we are talking about. 

When you are getting ready to check out at a craft store (Michael's. Hobby Lobby etc) they always have bins with craft things. We managed to get our hands on this pack of notecards WITH envelopes.
And look how adorable the designs are!! This is just a few of the designs in the pack.


And now all you need is your favorite stamp set and ink. Today we will be using this Hero Arts one. We love this set because it is not only cute but very versatile for any occasion. As you can see it's a well loved stamp set.


Of course if you have scrap paper around you can use it. The card we made as an example is using some scrap paper we had laying around and stickers (the hearts)  So using only these few things here is what you can make.


Viola! How simple was that? For just a few cents you can make many cards for every occasion. And you will be able to challenge yourself in stretching your stamp set. So we chicks encourage you all to try this and please share with us what you have come up with. Don't forget to check out our Instagram account to see more cards using this idea. 

Thanks for checking us out.
3 Chicks


Wednesday, May 7, 2014

Card Tutorial and a little bit about Card Kit Subscriptions

Hello Everyone!

Yes, us chicks are still around. We blame life for our disappearing act from the blogging world. Things have been busy crazy for us as it has for you I am sure. But we have been keeping our Instagram account updated and post things often. Feel free to check us out there (@threechickswithgluesticks). In fact, one our followers had a question about a card we posted. What a perfect time to do a video!! So we thank all our followers there, here and well everywhere. On to the project today....we used this adorable stamp from CC Designs along with some inks from Stampin Up, distress tool and stencil from Simon Says Stamps. See how clean the distressing is?  Watch our video to see how we did that clean and straight stencil look. Here is the card we made today.


Speaking of busy..........
Do you ever feel like things get crazy and all you wanna do is craft but your creativity is just not there? Well one of our favorite online stores SimonSaysStamp.com has the most awesome Card Kits (CK) ever! Their CK are perfect for beginners as well. These CK come with soo many things: paper, stamps, embellishments and oh, so much more. In fact, the distress tool used in today's video is from this months CK. Check it out:
Ugh, isn't this just cute?! As you can see this months CK is all about boys. Every month is a different theme. And you get ALL of this for only $19.95 (plus shipping). Oh, let's not forget the sweet lollipop included in every CK!  Can you see why we are so excited about these CK. Hope you can check them out.

Another favorite online store that we love has monthly Card Kits is Stampin Up. They have high quality products and their CK are different in that they come with ink pad and clear block. These kits are especially nice for beginners as it comes with what you need to make a card. Here is what their "trial" CK looks like:


This trial Card Kit is $14.95 and has just a few products to give you a taste of their products. If you like this, then you can order their CK and get more amazing things. Their monthly CK are also $19.95 (plus shipping). You can see more details on their website or you can even email us because one us chicks sells them. ;) 

We hope you can this useful.  Of course, these CK can be used for anything and everything, not just cards. We love Card Kits and well honestly, we love having things ready for us to make quick cards.

We hope you all have a great week and don't forget to check us out on Instagram and YouTube.

Thank you, 
3 Chicks

Wednesday, January 8, 2014

Something a little different...

Hello,

I really debated on making this post because this blog is really about crafting, but after I thought about it more (and talked with my fellow Bloggers) it's really about what we love. We love crafting, but we love so much more than just that. Our family and friends are a big part of why we make cards and crafts, we do it to make them happy.

Right now a friend of the 3Chick family has been handed a heavy hand; their amazing son, Maddux, has been diagnosed with cancer. You can visit GiveForward.com to see the full story on how they discovered that this brave 6 year old boy has Sarcoma.

He has been giving a fantastic battle, but there is always the unfortunate matter of how to finance such an endeavor. So many people have been coming up with great ideas on how to help this family raise money so that their only worry will be who gets to read Maddux a story at bed time. There is still a long road ahead and there will be more bills, but we're all confident that they will get taken care of.

The reason for this post is to try and help raise some money for the Hescock family. While working with someone from the Etsy website, we created some inexpensive but very nice quality window decals that boast the hashtag of our pride for this boy. #TeamMaddux shows that we're standing behind Maddux in his fight, no matter where we live. 

For $5 (plus shipping), we can send you the 2" x 7" water and weatherproof window decal displayed in the picture below. (To be clear, these are not clings and these are not stickers. They are decals which are more permanent and meant to be used on glass. With effort, however, they could be removed if that was something you wanted to do.)  

After sending your e-mail and shipping information to teammadduxfundraiser@gmail.com you will be sent a secured invoice via PayPal. If you have any additional questions, please feel free to contact me (Joyce) at the e-mail I just mentioned. 

100% of the money made from this fundraiser will go to the Hescock family. I know it won't bring a ton of money, but every little bit helps. You can also forward this information on via Instagram if you search the username: teammadduxfundraiser

Even if all you do is visit the GiveForaward website and send a hug or a donation there, we'll all be grateful for your time and consideration. We hope all are well in your lives!

Sincerely from the 3Chicks,

Joyce, Hannah & Marisol


Tuesday, November 5, 2013

G I V E A W A Y!

UPDATE: Congratulations to our follower Beth who won the challenge! She guessed who made the cards correctly! 
The correct order was: A: Marisol, B: Hannah, and C: Joyce!
Thank you to everyone who played and we hope to do another challenge in the future!

~ * ~

Hello! We're really excited about this post because it's our first ever giveaway! We have been talking about doing a giveaway for a long time but we just couldn't figure out what the best way to go about it was. So we finally decided to play a little game with our viewers and Instagram followers. So keep scrolling down for the official rules and prize information!

When we first started making cards, we couldn't really tell the difference between a Stampin' Up card to a Fancy Pants Design but over time, each of us girls gravitated towards styles that spoke to us and eventually we started creating our own styles of card designs. Over the last 8 months (Can you believe it's been 8 months since we started this blog?! Neither can we!) you've all had a chance to see our posts of various card styles and some of you may have even received some of these cards in your own mailbox! We're really curious if you've been paying attention to which cards belong to which Chick. Do you think you could decipher it?! We'd love to see you try!

Below you'll see a card designed by each Chick and they'll only be labled by Card A, Card B and Card C. Here you can see the full image to really get a good look at them. Then head over to our Instagram page and cast your vote! Here's what we'll need from you for your vote to count:

1) Subscribe to our ThreeChicksWithGlueSticks Instagram page. (Pretty please!)
2) Leave a comment with who you think created each card next to the letters A, B and C. (Hint: The only possible answers will be Hannah, Marisol and Joyce .... but probably not in that order.) Example of how it should look: InstagramName: A: Hannah, B: Marisol, C: Joyce
3) Only one entry per Instagram name.
4) Voting will be closed on November 29th at 5pm Central Time
5) From all of the correct answers, a random name will be chosen. The winner will be announced on our Instagram page to recieve shipping information.

We hope you all enjoy this little quiz we've made up and that a giveaway will become a regular part of our blog/Instagram schedules. Thanks again for following us and have fun!

Card A


Card B


Card C


Well now you've seen them, do you think you know which card belongs to each Chick?! Then head on over to our Instagram page and leave your vote! The winner will get each of these cards along with matching envelopes! Enjoy!

Thank you from the 3 Chicks,
Hannah, Marisol & Joyce

Friday, October 11, 2013

Cute As A Button!


Hello! How is everyone?! 
We've got some exciting things to talk about! First of all we're so excited to announce that we've had over 1,000 visits to our blog! Thank you so much! This has been such a fun experience for the three of us. We love that we can share what we love and we hope that we spark some creativity in our viewers  Thank you again so much for supporting us!

Secondly, in honor of our hitting 1,000 views, we're gearing up for our first giveaway! Depending on how much of a response we get, we're hoping this will be a semi-regular thing. We'll be posting more information on the giveaway very soon!

Finally, we've settled on our new theme for October: Buttons!


Buttons are getting very popular in the crafting world for so many reasons. They are so cute and so versatile in how they can be used. All three of  us decided to make a new card using buttons to show how many different ways that buttons can be used!

Marisol took an adorably animal approach to this challenge! The zebra paper and stamp make this card pop! She has a fantastic ability with blending! This is a great example that you don't have to use the same paper pattern throughout the entire card. The black ribbon accented by her green button gives a nice break in the card to change things up! The color scheme really is fun and creatively used here!

Hannah made this beautiful card! She used her well loved cloud punch in a variety of paper to create these dimensional rain clouds. The use of black was so smart! The streams of rain were created using a pen and some glitter! And the best part, the button rain drops! Her umbrella sentiment just gave the card the sweetest touch.


This is Joyce's take on the button challenge. In this card she used a pretty lace punch and a coordinating paper patter to give the inside and back a unique finish. Lastly, she strung some buttons on a string around the front of the card with some baker's twine. 

We all really enjoyed this challenge and we're going to be posting more cards we make throughout the month on our Instagram page so follow us there to see what else we come up with!

And don't forget to keep an eye out for our giveaway coming up VERY SOON! Thank you again to everyone for visiting our page! Let's make it 2,000 views very soon! 

The 3 Chicks,
Hannah, Marisol & Joyce

Sunday, September 15, 2013

What's up with Washi Tape

                                What's up with Washi Tape?

Washi Tape. Its all over Pinterest and taking over our favorite craft isles. If your like me I couldn't pass up the adorable prints. So I took some home with me and did my research ;) Just a little background info Washi is a style of Japanese paper tape. The manufacturing has spread throughout the world! Washi tape is reusable, biodegradable, and tree free (usually made of rice paper) In a few short minutes I came up with 4 cards and all together it took me under 10 minutes! Take a look at my results 

 I used a Border stamp for the top and bottom of the card and added my Washi Tape and gems to the middle
The focus of this card is the shine street lamp stamp and i added 3 strips of tape to the right for embellishment
Its a little hard to see from the lighting but the stamp in the middle is the Eiffel tower with a chevron background. This time I added the tape haphazardly. I love how it turned out!
I found this cute bike stamp at the bottom of my craft bin and thought it looked adorable with the matching tape


Washi Tape....You can tear it, cut it, stick it,reposition it,and write on it... The possibilities are endless!!!! I am now a Washiholic :) So the next time your in Michael's and the cutest printed tape is calling your name and telling you to take it home, It might be worth it! 


3 chicks,
Hannah, Marisol, And Joyce